
How to Clean Sanke Beer Kegs
The BREWHA Keg Washer is an economical manual cleaner that is an effective way of cleaning kegs. While chemicals can be used to remove any long term build up, the heat of the water is generally all that is needed to sanitize the kegs sufficient to safely store beer for several months.
While the approach we discuss here requires the removal of the keg spears which is a more labor intensive process than required with a coupler mounted keg washer, a few benefits are the lower capital outlay, and with the opening up of the keg, the insides can be visually inspected to they are clean before reassembly, ensuring the best quality of beer for your customers.
How to clean Sanke beer kegs
This video is in two sections, in the first we discuss how to clean Sanke kegs and readying them for filling, and in the second section we show how to fill them. We are using Sanke D kegs (which are the most common commercial kegs throughout North America) but the principles are the same for other commercial and homebrew kegs.
Chapters:
Washing kegs
01:22 Assemble Manual Keg Washer for rinsing
01:45 Rinse Kegs
02:24 Release gas from kegs
02:54 Remove retaining ring and rotate spear
04:04 Withdraw spear
04:23 Rinse kegs
04:51 Connect brewery pump to BREWHA fermenter
05:23 Fill fermenter with water
05:48 Submerge spear and wash keg
06:24 Replace spear in keg and install ring
07:26 Purge and fill with CO2
Equipment used in this video:
BREWHA Manual Keg Washer product page
BIAC complete microbrewery system product page
The BREWHA Keg Washer is an economical manual cleaner that is an effective way to clean kegs. While chemicals can be used to remove any long term build up, the heat of the water is generally all that is needed to sanitize the kegs sufficient to safely store beer for several months. While the approach we discuss here requires the removal of the keg spears which is a more labor intensive process than required with a coupler mounted keg washer, a few benefits are the lower capital outlay, and with the opening up of the keg, the insides can be visually inspected to they are clean before reassembly, ensuring the best quality of beer for your customers.
This video is in two sections, in the first we discuss the washing of Sanke D kegs and readying them for filling, and in the second section we show how to fill them. We are using Sanke D kegs (which are the most common commercial kegs throughout North America) but the principles are the same for other commercial and homebrew kegs.
To clean kegs, follow these steps:
1. Assemble keg washerPlace the BREHWA Manual Keg Washer inside the Large BREWHA conical fermentor or 120L/1BBL Mash Tun, connect the Keg Washer return arm to the Keg Washer stand with the short 3/4" hose, 3/4" gaskets and clamps. |
 |
 |
2. Rinse kegsTo first rinse old beer out of the kegs, connect clean tap water to the Keg Washer. A short section of 1/2" silicone hose can be adapted for this. Clamp a 1/2" hose barb x 1.5"TC to one end, and a female garden hose x 1/2" hose barb on the other (most hardware stores carry the GH fitting but an assembled unit can be purchased from BREWHA). The hot tap water will flush the keg and rinse beer and sediment out. |
3. Release gas from kegsTo remove the spear, release all gas in the keg by turning down on a Sanke spear valve compression tool which can be purchased online from keg suppliers; the best (but expensive) one we have seen is made by Micromatic (their part number 940-914) to fully depress the spear. Releasing all pressure before removing the spear is very important for safety reasons. (At all times follow all safety precautions recommended by the keg supplier.) |
 |
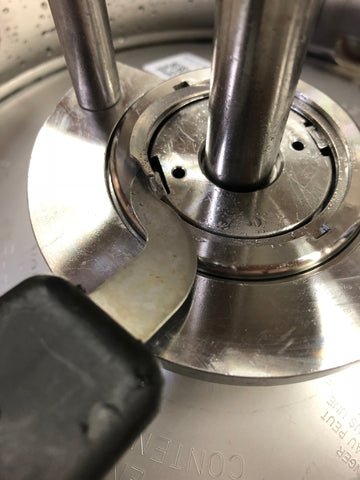 |
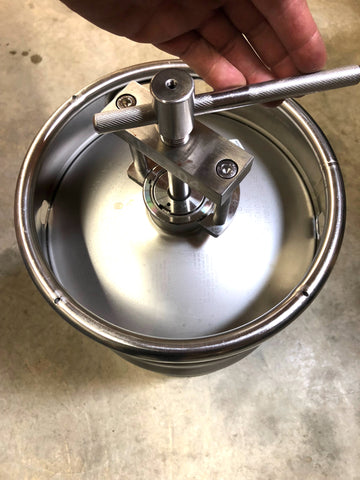
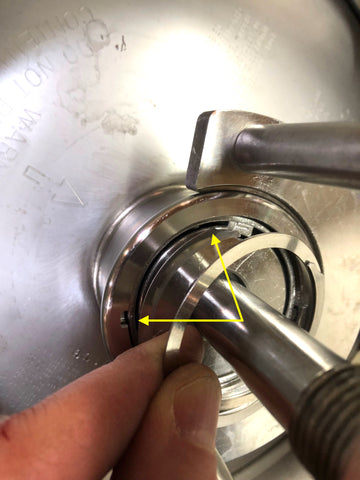
4. Remove retaining ring or circlipOnce the pressure is released, and with the spear removal tool still fully depressing the spear, remove the retaining ring/circlip that holds the spear in place. Micromatic has a ring removal tool (part number 941-976) that makes circlip removal easy, but it destroys the circlip in the process (they are about $1ea to replace.) Alternatively, there are specific 'spear removal knives' like shown in the picture (can be purchased from keg suppliers online), a hook and pick set (the hook is my preference, ), or a small flat head screwdriver or other implement can also be used. The retaining ring is notched on each end so with the tool, move the ring towards the center until the end of it pops out of the channel that it sits in. This can be challenging the first few times, but with practice, a good method can be developed. Once the ring starts to pop out, it can be easily removed the rest of the way by gently pulling all around the ring with your fingers towards the middle of the keg. |
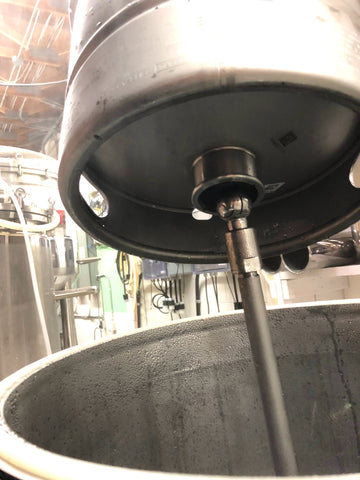
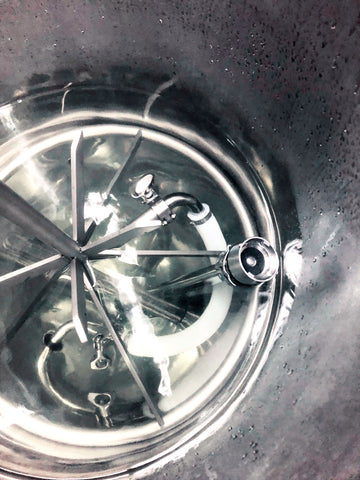
5. Remove the spearOne the ring is removed, release and remove the spear removal tool and retainer ring. To withdraw the spear, it needs to be rotated about 5 degrees until the spear notch and keg groove line up. |
 |
 |
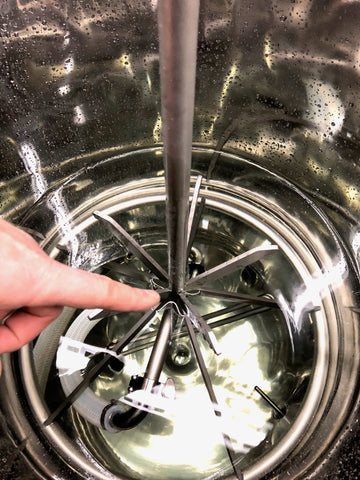
6. Rinse kegsThe keg can then be lowered over the BREWHA Keg Washer spray ball until the keg rests on the supports. Tap water can be ran into the apparatus to rinse the keg out. The bottom dump valve on the fermenter (or other vessel) should be left open so the rinse water can drain. When using tap water, but especially with the near boiling water during the sanitize phase, it is important to wear insulated rubber wash gloves (like the ones resting on the pump in the picture below). |
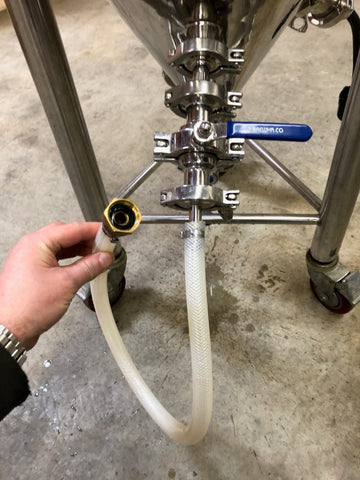
7. Connect pump to the CIP keg cleanerOnce the kegs are rinsed, connect the BREWHA fermenter (or BREWHA 120L Mash Tun) to your recirculation pump. A powerful 1hp pump (like the commercial grade brewery beer pump that we sell) is recommended as it provides a high pressure spray to aid with cleaning, but smaller pumps can be used as well. The larger hose (1"ID) provides water from the vessel to the pump, the smaller (3/4"ID) hose sends water from the pump back to the cleaner apparatus. |
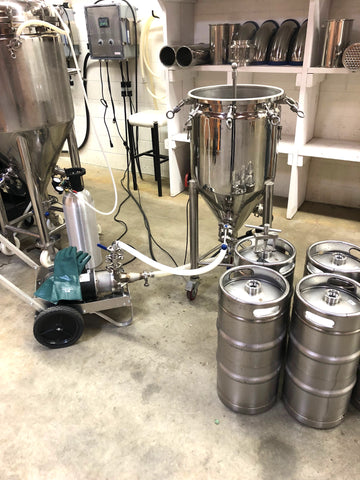 |
 |
8. Fill fermenter with waterFill the vessel with water until the level is where the keg support arms meet the vertical pipe. If the water level is too low, the hot water evaporates more as it falls back into the vessel, and the heating element has to work harder. Ensure the heating element is always completely covered with ample water. Heat the water to just shy of boiling. |
9. Submerge spear and wash the kegThe keg spear can be submerged into the near boiling water to heat sanitize it. The spear can be inverted to let water fill the spear and to ensure that the head is fully sanitized. Drop the keg over the spray ball, turn the pump on and let it spray hot, sanitizing water into the keg for about 2 minutes. Then turn the pump off. |
 |
 |
10. Replace spear in keg and install circlip ringOnce the water drains out of the keg, remove the keg and spear (remember to wear insulated wash gloves as they will be hot), lower the spear back into the keg and with the help of the spear removal tool (this should be heat sanitized too so it doesn't infect the top of the spear) put the retaining ring back in place. It is generally easiest to replace the ring if it is started into the groove about 60 degrees clockwise from the locking tab. This ensures that the beginning and end of the ring are not located at either of the two locking tabs. Ensure that the retaining ring has moved fully back into the groove. If the ring is not fully in the groove, it could come loose under pressure and project the spear out forcefully. Never stand over the spear directly. Replace the ring for a new one if damaged in any way or replace with each install. Always follow all keg manufacturer guidelines. |
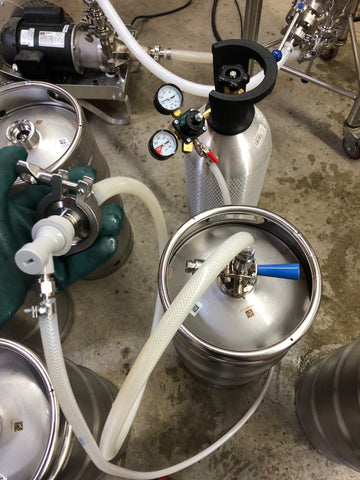
11. Purge keg of air and fill with CO2The final step is to add CO2 to the kegs at this point to purge out the oxygen and pressurize the kegs (optional) so that they are ready to fill with beer (don't add more CO2 pressure than the pressure of the fermenter or CO2 will blow back into the fermenter; e.g. if the fermenter is at 12psi, fill the kegs to not more than 12psi). CO2 can be added with the same hose with which you fill the kegs with beer. By simply connecting a Gas in Post to the Fermentor to Keg Racking Hose CO2 can be easily added to your kegs. (To permit CO2 or beer to flow 'backwards' through the Sanke coupler, the liquid and gas check valves need to be first removed. It is recommended to keep a dedicated coupler just for racking beer.) |
 |
Filling kegs with beer
Once the kegs are purged they are ready for filling with beer. If you won't be filling right away, cap the top of the keg to keep it clean; 2" TC plastic covers (like the plastic caps that come with the BREWHA 2" butterfly valves) work great for this or tin foil or caps can be purchased online from keg suppliers.
And now, click on this link to learn how to fill Sanke kegs.