
Disassembling the BREWHA Sanitary Ball Valve
Product residue can remain inside any valve. Regularly disassembling your sanitary ball valve allows you to clean the ball, stem, seals and interior surfaces that are not fully accessible while the valve is assembled.
The BREWHA full-bore sanitary ball valve is designed for quick disassembly. A small wrench may be needed to loosen the factory-tightened handle nut the first time; after that, routine disassembly and reassembly can normally be completed by hand.
Before disassembling the valve
Important: Isolate the vessel or process line, release all pressure, drain the liquid and allow hot equipment to cool before removing the valve. Never loosen a clamp or open a valve body while the connected equipment is pressurized or contains hot or hazardous liquid.
Work on a clean surface where the ball, stem, clamp, nut and seals cannot be lost or contaminated.
Tools and cleaning supplies
- A small wrench for the initial handle-nut adjustment
- Approved cleaner and sanitizer suitable for your process
- A soft, non-abrasive brush or cloth
- Clean replacement seals if any installed seal is damaged or worn

How to disassemble the sanitary ball valve
-
Loosen the handle nut
If necessary, use a small wrench to loosen the nut on the valve stem. Do not remove it with the wrench.

-
Unscrew the nut by hand
Once the nut is loose, continue turning it with your fingers. For subsequent cleaning, the nut normally only needs to be finger-tightened.

-
Remove the handle nut
Lift the nut off the valve stem and place it on the clean work surface.

-
Loosen the handle
Gently wiggle the handle up and down. If it is tight during the first disassembly, lightly tap the underside of the handle near the valve stem until it releases. Do not strike or pry against the sealing surfaces.

-
Remove the handle
Lift the handle straight off the valve stem and set it aside.

-
Loosen the body clamp
Turn the clamp wing nut by hand until the clamp can open.

-
Open the clamp
Release the lower half of the clamp while supporting the valve body so the internal parts do not fall.

-
Lift off the clamp
Remove the clamp from the valve body and place it on the clean work surface.

-
Separate the valve body
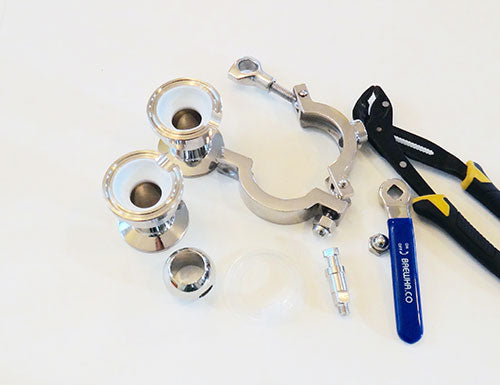
Carefully open the valve body. Keep track of the ball, stem and seals as the two body sections separate.

-
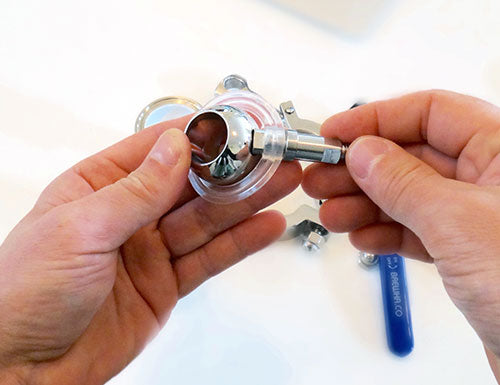
Disconnect the stem from the ball
Angle the stem slightly downward to disengage it from the ball.
-
Remove the stem seal
Gently work the seal off the stem without stretching, cutting or scratching it.

Clean and inspect the valve parts
Clean the valve body, ball, stem, clamp, nut and seals using chemicals, concentrations, temperatures and contact times approved for your process. Use a soft brush or cloth and pay particular attention to the seal grooves, stem opening and surfaces that contact the ball.
Rinse and sanitize as required by your sanitation procedure. Before reassembly, inspect every seal for cuts, swelling, flattening, brittleness or other damage. Replace damaged seals rather than returning them to service. Also inspect the ball, stem and valve body for residue, scoring or damage.
How to reassemble the sanitary ball valve
- Place one valve-body section flat on a clean work surface.
- Seat the clean body seals fully and evenly in their grooves.
- Reinstall the stem seal and stem, then engage the stem with the ball.
- Position the ball and second body section without pinching or displacing the seals.
- Fit the clamp around the valve body and close the hinged section.
- Tighten the clamp gradually. Keep the gaps between the clamp halves approximately even rather than tightening one side excessively.
- Reinstall the handle in its original orientation and finger-tighten the handle nut.
- Move the handle through its full range to confirm that the ball rotates smoothly and seats correctly.
After reassembly, test the valve with water and inspect it for leakage before returning it to service. Confirm correct operation under the procedures and conditions approved for your equipment.
How often should a sanitary ball valve be disassembled?
The appropriate cleaning frequency depends on the product, process, solids, sanitation program and applicable operating requirements. Disassemble the valve whenever your validated cleaning procedure requires it, whenever residue may be trapped inside, and before returning equipment to sanitary service if cleanliness is uncertain.
Need a replacement valve or internal seal? View the BREWHA stainless sanitary ball valve and replacement-gasket options.
1 comment
You just resolved my biggest headeach when it comes to cleaning my system after a long brew day. I need 7 of the 7/8" ball valves. Outch !