
Eight Ways to Improve Mash Efficiency
Mash efficiency refers to the extent to which you are able to pull the sugars out of the malted grain and into the water. A high percentage of sugar recovery (75-90%) is called 'high mash efficiency'. A low percentage (60-75%) is called 'low mash efficiency'. Since the amount of sugar in the water correlates quite closely to the amount of alcohol you will have in the beer, it is important to understand mash efficiency in order to produce consistent results when mashing.
A low efficiency can be compensated for by increasing your grain bill (the amount of malted grain you start with). For example, if your mash efficiency is at 70% resulting in an alcohol content of 4% in your beer, you can increase your grain bill by 20% to bring the sugar and alcohol content higher. But this also adds cost to your brewing as the extra grain costs money and with more grain, you need a larger mash tun which also adds cost. The best way to increase mash efficiency is through proper technique.
First, it is important to ensure is that your ingredients are fresh. The yield will be lower with oxidized/stale grain.
Second, it is important to have a proper crush size and properly crush the grain. For most systems, a crush size of 0.04-0.48" (1.2mm) is the best (if routinely seeing a stuck mash where wort will not flow through the grain bed, one solution can be to increase the crush size slightly). It is also very important that grain be 'crushed' and not 'ground'. Grinding involves shearing of grain into fine particles (that gum up), whereas crushing sends cracks throughout the grain that open up to insides of the grain to water and enzymatic digestion. A 3 roller mill generally provides a better crush than a 2 roller mill, and if all rollers are geared (so they all turn under power rather than relying on friction which causes shearing) that is better; the Crankandstein 328G mill is fully geared. The speed of the mill is also very important to maintain. The mill rollers should rotate at about 150rpm, whereas most electric drills operate at 600-1800rpm. Pulleys can be used, or a simpler solution is to purchase a variable speed drill and use it on a low setting. If the variable speed drill is a manual type (where depressing a button manually will be tiresome and inconsistent) it can be helpful to use a '120V fan speed controller' to control the drill speed to 150rpm (if it is hard to calculate the speed, put a piece of visible tape on the drill chuck and count the number of times it passes each second—it should be close to 3/second). If the drill is not strong enough to turn the mill on low speed, the grain intake inside the hopper can be restricted to let less grain through at one time—it will take slightly longer but your crush will be more effective.
A third step is to ensure proper water chemistry. Water chemistry is a complex topic which we won't get into here, but if you suspect water issues, try brewing with bottled (spring or RO) water that you know is fairly neutral, add the minerals you need (calcium is especially important with minimum 50ppm recommended), and compare results.
Fourth, ensure mash pH is between 5.1-5.3.
Fifth, ensure the grain is thoroughly mixed with the water. Clumps of grain and air can easily form when mixing the grain with the water. These clumps prevent water from accessing the crushed grain inside the clump, preventing the carbohydrates from being dissolved into the water and preventing enzymes from breaking the carbohydrates up into sugars that the yeast can digest. Mash in using the following steps:
- Ensure the pump is turned off as the grain should be given time to settle slowly.
- Add grain (including rinsed rice hulls is essential if using rye or a high percentage of high protein and/or no husk grain like wheat, but also helpful for improving bed fluidity and therefore efficiency with regular malt; add at 1-5% by weight depending on the grain being added) slowly in a circular motion so it doesn't 'pile up' on the surface, and allow time for the grain to sink naturally (for commercial customers our Grain Bag has a chute that is controllable and can make this easy).
- Dark malt should be crushed separately and added last as it tends to crush finer which impedes the flow of wort; keeping it near the surface ensures it does not form a dense 'mat' near the bottom.
- Ensure any grain/air clumps are broken up and a proper grain bed forms. The BREWHA Mash Mixer is an easy and effective way to mix the mash but do not overmix by mixing too quickly or too much (as this can pulverize the grain increasing the chance of a stuck mash) and DON'T go near the bottom of the Colander to the disrupt the grain bed that has naturally formed by the larger grains settling faster through the water. With a proper crush and slow addition, mixing can and should be very minimal.
Sixth, closely regulate mash temperature. The enzymes that work to cut up carbohydrates into smaller sugars that yeast can digest (in the process called 'saccharification'), producing CO2 and ethanol (alcohol) in the process, work best at specific temperatures. If the mash is not kept at the precise temperature the recipe calls for, optimal results and consistent efficiency will not be achieved. The first step to ensure the proper temperature is to ensure the strike temperature is sufficiently high. Since the grain addition will cool the water, the temperature of the water before adding grain should be above the mash temperature. Grain will generally cool water by 5-8C/10-15F so the strike temperature should be that much higher. After mashing in, check the temperature IN the grain bed with a thermometer to ensure the strike temperature was high enough. The mash temperature can be regulated with BREWHA vessels since the mash vessels (mash tun or fermenters) have built in ports for heating elements and temperature sensors to precisely control the temperature of the mash. If a large temperature rise is needed, the temperature in the cone can be set substantially higher than the mash temperature to reduce the time needed to raise the temperature in the grain bed; this is similar to a decoction type method which is explained more fully in the BIAC manual mashing section—see pg. 47 for details.
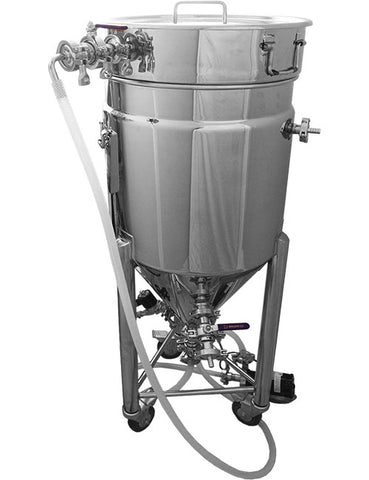
The seventh tip for increasing mash efficiency is by using a recirculating pump (or stirring occassionally if you don't have a pump). The pump pulls wort (sugary water) out of the bottom of the mash vessel (past the temperature sensor and heating element under the mash screen) and puts it back into the top of the mash vessel above the grain bed. This circulating action provides movement of the enzymes and water past the crushed grain resulting in a more even temperature throughout the gain bed and the greatest interaction of the enzymes and grain carbohydrates, leading to greatest efficiency. When circulating with the pump, the return flow back into the mash vessel should be throttled with a valve to ensure the grain bed is not compacted as this will impede saccharification (enzymes converting the complex sugars/starches into simple sugars the yeast can digest) and could damage the heating element. 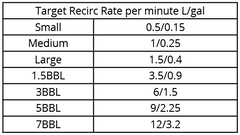 After adding grain and starting the mash, let the grain sit for a minimum of 10 minutes before turning the pump on to allow the grain to absorb water and expand; start the pump with the return valve (on the Mash Colander or the pump exit—not inlet which should always be fully open) closed and open slowly until the proper recirculation rate is achieved (see the table to the right for recommended recirculation rates). Check the temperature of the returning wort to ensure it is not cooling the grain bed—particularly with a Small Colander, the return rate needs to be very slow, and cooling can occur in the hose; if this occurs, the temperature of the wort in the cone should be raised by up to 2C/4F above the mash temperature (a higher temperature is used with very low flow rates like are needed in the Small BIAC as more cooling occurs the longer the wort remains in the hose). If the wort level is rising at the top of the mash vessel, it indicates that too much volume is being moved by the pump and the flow should be throttled with the valve (install the valve ONLY on the downstream side of the pump either on the pump exit or on the Mash Colander port, or the pump will not work properly and could be damaged). If the wort stops moving down through the grain bed (or moves only very slowly) it likely means the grain bed is compacted and may need to be stirred up and reformed. If the pump plugs frequently when using the BIAC complete brewing system (due to grain falling to the bottom of the fermenter and entering the pump hose), the hose from the fermenter to the pump can be attached to the side racking port (instead of the bottom) to prevent grain from being drawn into the pump. With a very thick mash, channeling of the wort down through the mash may occur so use of the Mash Mixer at intervals to disrupt the top 4/5 of the mash bed may be helpful.
The eighth action is to slowly sparge the grain while lautering. The tendency at the end of mashing is to want to hurry the lautering and rush into boil. This is a mistake as far as increasing efficiency is concerned. Residual sugars inside the grain do not immediately flush out with fresh water but slowly diffuse out. If not given sufficient time (around 60 minutes to sparge and lauter is not too long) they will remain in the grain and recovery of sugar will be decreased. Hot sparge water (75C/167F) will generally give better results than cold sparge water as sugars are more soluble at higher temperatures.
To confirm that saccharification is complete, a starch/iodine test can be completed. If starch is still present, a drop of iodine will turn black. If starch is not present (ie. the enzymes have converted all the available starch into smaller sugars that the yeast can digest) the iodine will stay a yellow color. In most situations, wort will convert quickly (within 15-30 minutes) so the best way to check for starch (this tip was given to me by Ken Grossman of Sierra Nevada) is by removing a piece of grain and dropping the iodine directly on the grain; ideally the entire grain should stay yellow, but since this is rarely achieved at least all but the tip (where it is hardest for water/enzymes to get to) should stay yellow. If most of the grain turns black, let the mash run a while longer. (It goes without saying—don't add the iodine back into the mash; throw it out or wash it down the drain.)
With an appropriate mash period (60-90 minutes is typical), proper crush size and water chemistry and by observing the above actions, consistently high mash efficiency can be achieved.
Proper crush size and tips for preventing a stuck mash
Technique on how to improve mash efficiency
Learn more about why the BREWHA brewing system is the simplest way to brew the best beer